


Alright, so you've seen them all over the place on blogs - those little sidebar widgets that magically scroll through blog buttons, books you've read, or anything you can think of. And now, you want one.
Here's how to do it...
First of all, you need open up your Blogger Dashboard, and click "Design". Then, go ahead and click Add a Gadget in your sidebar column.

Click HTML/JavaScript.
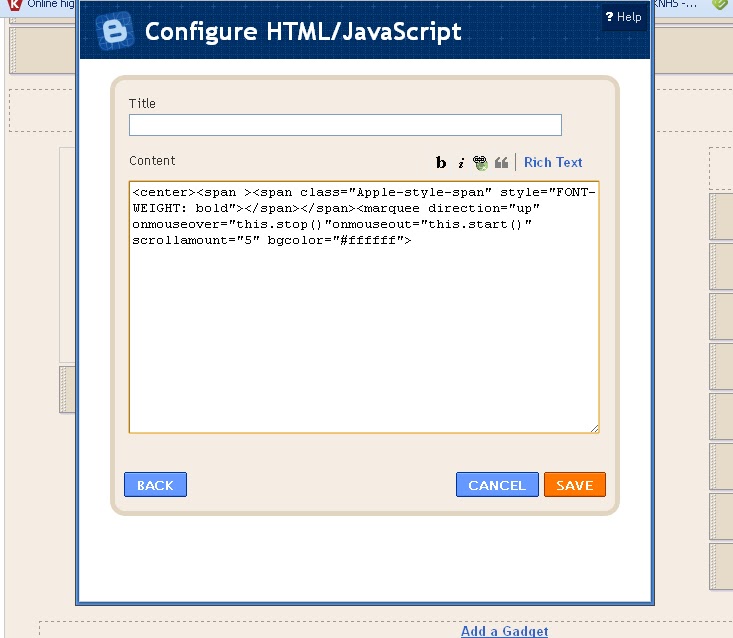
Paste the below code into the box:
______________________________________________________________________<center><span ><span class="Apple-style-span" style="FONT-WEIGHT: bold"></span></span><marquee direction="up" onmouseover="this.stop()"onmouseout="this.start()" scrollamount="5" bgcolor="#ffffff">
_______________________________________________________________________
What does this do? Let's break it down.
span class="Apple-style-span" style="FONT-WEIGHT
This, (I think) tells the widget what to put in there, and how wide it's supposed to be, although I'm not entirely certain on this point. This widget is going to span the width of your blog sidebar - if the buttons are cut off at the sides, your sidebar may be too small....
marquee direction="up" onmouseover="this.stop()"onmouseout="this.start()
This tells the widget to stop scrolling when your mouse hovers over it, and start again when your mouse moves away.
If you want your buttons to move a different direction, change "up" to down, left, or right.
scrollamount="5" bgcolor="#ffffff">
This is the only part you might need to/want to edit. "5" tells the widget how fast to scroll. The higher the number, the faster it goes.
You can change the background color by changing the #ffffff to an HTML color code of your choice.

Now, go ahead and gather together all of the blog button codes that you'd like in your slide.
It's a fantastic idea to paste them all into a .txt file or something of that sort beforehand.

Now, paste your button code(s) below the first code you put in like in the screenshot above.

If you put in multiple codes, remember to leave a space between each one!
Your end result will look something like this...
Thank you so much for this tutorial, Amanda, dear! I shall have to do this tomorrow:)
ReplyDeleteThanks again, sweet girl!
Love,
Hannah
I'm going to try this out right now! Thanks Amanda.
ReplyDeleteOh, and hopefully you'll see this comment. I'm having some trouble changing the font on my blog. I've followed directions from here (http://mydesignergirl-tutorials.blogspot.com/2010/04/fonts-text-transforming.html), but the font for my posts and the fonts in my sidebar haven't changed. I really hate that the side bar font is Times New Roman now for some reason. ?? I added a cool handwriting font for blog titles/dates/etc that I like, and the font at the ENDS of my posts changed via the tutorial I followed (the one at the link above) but idk if I did something wrong? I was wondering if maybe in your free time you could take a look. Its the same font that you have on your blogs, and your mom has. I really like it, and although I've seen it on lots of blogs - I found a tutorial for it, and I like it, so yeah. (I'm not copying or anything. lol)
If you can figure out what's making it not work right, that would be great. No rush!! I know I send you lots of emails...and questions. lol Hope your school work is going well. I'm excited to start my new courses. Although I STILL have the final two exams from Music Appreciation. UGH! :P
TTYL!
~~Liz